Showing posts with label chocolate. Show all posts

Christmas Cake Pop Sophistication

Attempting these cake pops is more then a year and half in the making. It was lunch time this exact time last year with my best friend Amanda. We were discussing our differences in styles. This is us...

Amanda and Heather
I am not happy unless something is dipped and dripping in glitter. While we were lunching Amanda said something that struck me (I am sure she won't even remember). She said, "My biggest problem with your cake pops and all this cake pop madness is what if you are a grown up?" "What if I don't want to eat a Princess head or some other cutesie thing." This was just about the time I brought these to work last year for Christmas:


I have been thinking about our conversation since last year. I decided for this Christmas to make a Christmas cake pop a little more on the subdued side. Something a little classier. Something I think Amanda might order if she was throwing a high class Christmas party for adults.

I decided on a simple green candy melt base with red ribbion frosting wrapped around it. (I am still working on my piping skills but I think they came out mostly decent). I hope if you are more classy like Amanda and less glitter like me these cake pops will give you some ideas for your Christmas party this year.


Now about my Glitter Tree!!


Merry Christmas. May all your baking adventures go amazing and if they don't, may you get it on video and put it on youtube so I can laugh along with you!

Mummy Spooky Cake Pops

I received a few emails asking for links to the Mummy Cake Pops I made last year for Jordan's Halloween Party at School. Because this is what I will be making again I decided to share my version of the
Yummy Mummies by Bakerella again this Halloween for your little spooks to enjoy!

FOR SCHOOL:
 All children can have allergies to foods like peanuts but special needs children seem to have these allergies at a higher rate. It is a good idea when ever shipping your little hero off to school with a new batch of HeroCakePops to make sure they are labeled with ingredients for the teachers.

Now turn to page 131 in Bakerella's Cake Pop book and lets make some Yummy Mummies!

First we need one mini-hero dressed as a bee....Check!

Then we need to bake our cake - let it cool - mix it with 1/3 can of frosting - roll cake pops!

The great thing about Mummies is they can be what ever color you like best! I dipped my cake pops in white chocolate (candy melts)  This part is all up to the artist/baker (or the baker's helpers)!


Then we need some green and white Yummy Mummies!! After baking the basic cake pop (I used a store bought white cake mix for ease) and cooling the mummies were ready to be painted with candy melts.I first coated all the mummies in white like described in the book. Then once all mummies were made I used green gel based coloring (never water) and tinted the rest of the white candy melt booger green! I then used a disposable piping bag to pipe on the mummy wrap!


Remember the more mess the more it looks like a Mummy! I hope everyone has Happy and
safe Happy Halloween!

For more AWESOME ideas for cake pops and Halloween treats head over to our
Flickr Group Cakes On A Stick!!

DazzlePopDiva takes a Walk on the Dark Side

Hello my fellow Divas!
As we move through dreary February (remember, I live in Michigan), sometimes one needs a bit(e) of indulgence to brighten the spirits. With this in mind, I decided to make some special pops that I call DecadencePops. These pops will revolve around an extremely rich, heavily-flavored cake ball, coated with dark chocolate and dusted or decorated as my whim desires.


So...after that description, do you really need an excuse? I didn't think so. And now, on to the important stuff. Introducing DecadenceDevilPops!


Yes, I AM smart ;)
To begin, choose a rich heavily-flavored cake recipe. I chose to make devils' food cake for this batch. Use either a dark chocolate or vanilla cake frosting to form the balls. In keeping with the chocolate theme, I chose to use chocolate frosting.


Look! You can see my flash!


In this batch, I deviated from using chocolate candy melts in favor of semi-sweet baking chips for two reasons:
1. I was out of chocolate candy melts
2. Chocolate baking chips harden (eventually) to a high glossy finish

On the other hand there are a few disadvantages to using baking chips; for instance, candy melts harden more quickly and solidly than baking chips. Baking chips also retain a tacky surface and are sensitive to being over-handled.

From here it is just a matter personal Decadence preference!
(I dare you to say that quickly 3 times!)
I used the same type of Decadence typically found on chocolate truffles. I crushed English toffee and chocolate covered espresso beans (separately) in my food processor until it was reduced to dust, essentially. Then each DevilPop got it's own healthy coating of Decadence!

Crushed chocolate covered espresso beans
Crushed English Toffee
In the end, these cake pops turned out to be a wonderfully rich filling dessert that won't last in my house for very long at all.

During the course of my experiment with the DecadenceDevilPops, my awesome Sissy/Partner was (digitally/spiritually) right beside me offering her expertise and essentially, babysitting me. We decided to conduct further experiments using a combination of baking chips and candy melts to achieve a hybrid dipping mixture that delivers a richer flavor, high gloss and structural stability. Because science is important. (Yet another reason to make more cake pops, in case you needed one.)

Wishing you ALL one hour of indulgence this week!
Alicia the DazzlePopDiva

Merry Christmas!

Merry Christmas to all my friends in Blogger World. I hope the New Year brings you family, love, happiness and peace.

What are your family traditions on Christmas? Can you guess one of mine? That's right! Baking!

Got My Wilton Chocolate Pro and about to go to chocolate heaven!

Sprinkles make all the world better.

Nestle mini chocolates

I could really just eat a spoon full of chocolate right now and be happy.


Bring on the pumpkin..pie pops that is.

I love pumpkin pie. I know everyone says that but it is my all time favorite. That is saying a lot because I really really love me some pie. Apple pie, sweet potato pie, cherry pie and pretty much every other pie ever made. If you pie it, I want to eat it. So that being said I love pumpkin the most. That is why when I saw pie pops on Bakerella's site I had to make some pumpkin pie pops. Now on Bakerella's site she uses cherry pie mix but you go right ahead and fit your own pie needs. My pie needs are pumpkin so that is what we are doing today. We are also going to be making Bakerella's pumpkin pie bites with our left overs.

First we need to make pumpkin pie mix. Now there is nothing wrong at all Ladies and Gents with buying an already thrown together pumpkin pie mix and skipping this first part. However as I mentioned before I love me some pumpkin pie and only homemade my way will do the trick.

We are going to need:
4 oz. cream cheese, room temperature (Bakerella's calls for 8 ounces but I use four to cut down on the fat
                                                             and it works just a great.)
1/2 cup sugar (I use brown sugar only when making pumpkin anything)
1 1/2 cup canned pumpkin
3 eggs (only two go in mix, one is for washing the pie crust with egg white)
1 teaspoon vanilla (If you love vanilla like me don't be afraid. Go ahead and add a dash more)
1 teaspoon pumpkin pie spice (Ok I use my own spice mix of cloves, honey and cinnamon but you do your pie however your Momma raised ya.)
Cookie cutter: heart shaped, round shaped, pumpkin shaped. What ever fits your moods Cupcakes.

Now if you have a mixer this will be even easier for you. I am not The Princess of anything (except
laundry. I totally rock out laundry) so I can't ever seem to justify spending a car payment on a mixer. :(

Get ready to get your beat on!


Place some parchment paper on the surface you are going to be working,
grab your pie mix, store bought pie crust (unless your Martha Stewart and then you are
awesome and should only ever eat your own homemade pie crust because
everything else would be lame)  some flour and lolly-pop sticks.

My little Matryoshka Measuring cups I got from
Bakeitpretty have a duel purpose today. They are going to be
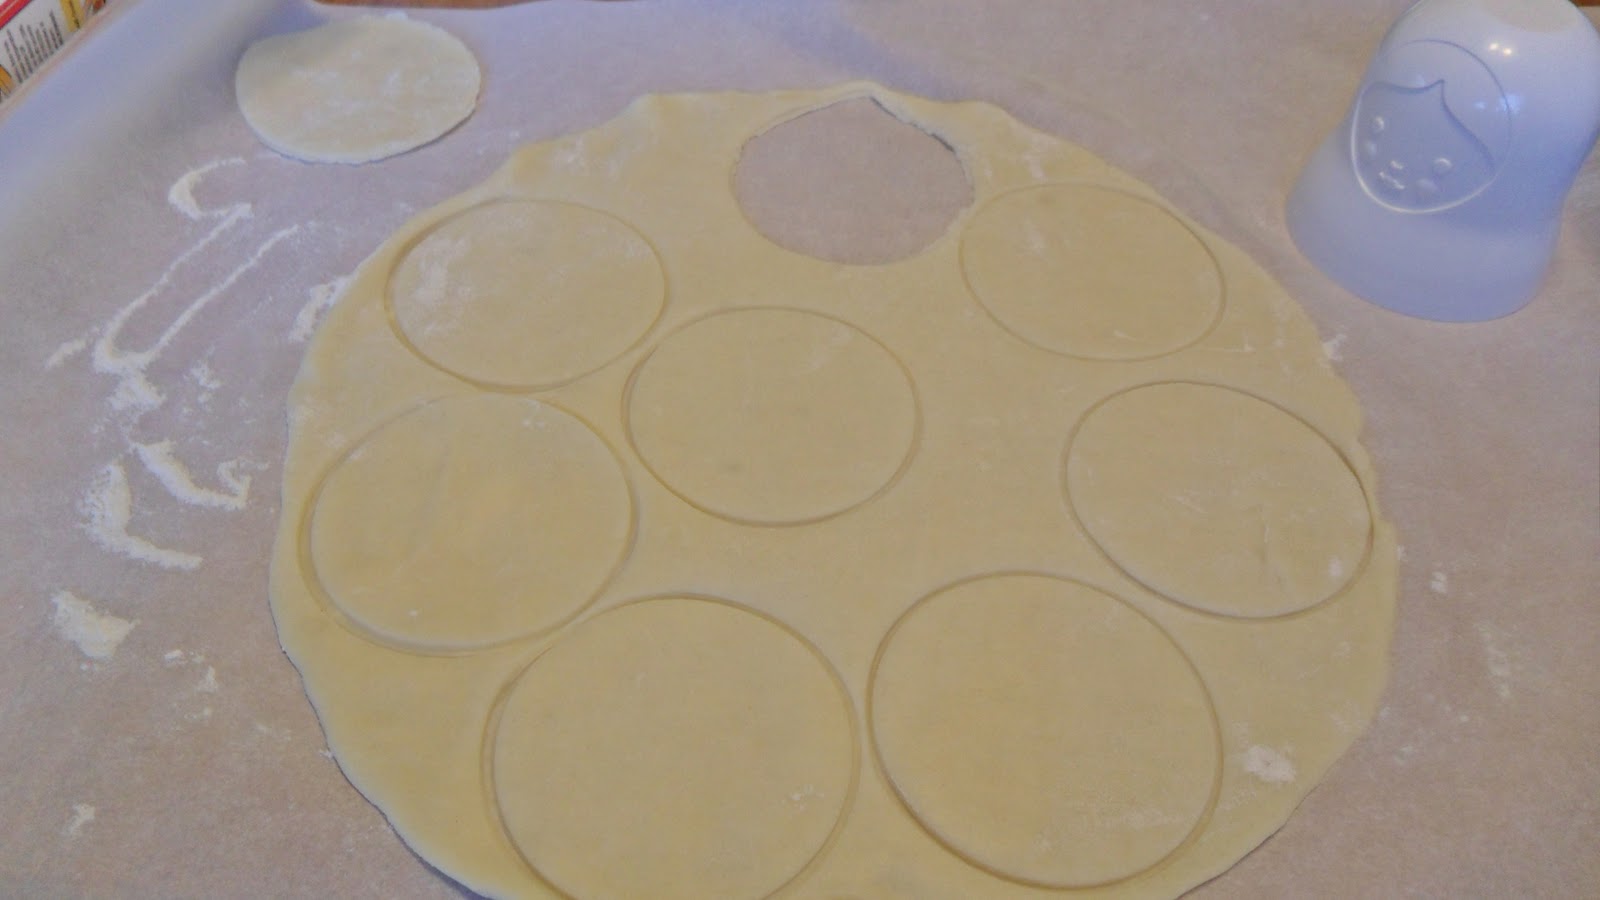
my prefect size round cookie cutters to cut out the pie shells.


Just press down and twist with your cookie cutter until you have an equal amount
of circles. Remember you will need two circles for each pie pop. One for the back and one
for the front.

Once I have the circles I like to line them up factory style and place the lolly-pop
sticks in the bottoms circles. Just half way should be prefect.


Add the pie mix to the center of the pie circle with the lolly-pop stick already in it.
Then cover with a second circles and crimp the sides down with one of the extra
lolly-pop sticks or a fork so it is nice a sealed. Don't worry if a little leaks out. Just
run a lolly-pop stick along the edge and it will clean that right up.


My premade pie crust I bought came with two pie crust so after I finished the
pie pops I decided to make mini pies with the left over pumpkin filling and crust.
Same principle as the pie pop. Cut out the circles and then press one pie
circles down into a mini muffin pan. Fill in with extra pie mix.  


After I baked them at 375 degrees F for 12 minutes. They came out perfect.
Don't worry about them being a little bubbly when you take them out they will
deflate a little while cooling.

Now we have the pie pops and mini pies all baked and cooled we need to decorate Cupcakes!


I used a brown chocolate candy writer to decorate these. Bakerella
drew pumpkin face on her mini pumpkin pies and those were cute too but I
wanted something a little more traditional for this Thanksgiving and little less
cutie.


Do you have a coffee pot Cupcake? Well if you do then I am going to tell
you melting these will be super easy. Just fill the coffee pot with hot water (not boiling) from the tap.
Place the tube in the water until it is soft and chocolate melted. Then open it up and paint away!


Isn't pumpkin just the best invention ever.

Yummy.

I hope everyone has an amazing Thanksgiving filled with lots of love, family, kindness, thankfulness and some really good eatins! Take pictures of you Thanksgiving meals and share them with me at my Community: Mommy Baking love into it.. I would love to see them Cupcakes!

Chocolate Wonderland

I know. I know. We are not even to Thanksgiving yet but this visit was for a good cause. To take some of the most amazing people I have been blessed to meet (my Boyfriends Parents) to Chocolate Wonderland! What is a better cause then chocolate Cupcakes?

If you ever visit lovely Las Vegas there is so much more then just neon lights and slot machines. One of those happens to be Ethel M Chocolate Factory. You can visit and watch the chocolate made, learn the history of chocolate, sample the chocolate and then visit their three acre cactus garden. It is lovely. Just around Christmas time they decorate with amazing lights that sparkle for miles. It is Chocolate Wonderland.


I found my life quote...

I love Swiss

Skittles have always been my favorite candy and now
I know why! Hook Em Horns!

Ryan and my baby J in front of Chocolate Wonderland.

Ryan's Parents or to Jordan: Papa and Dina.

Hello to you to yummies!


Cactus Garden decorated with sparkles