It's a Christmas Cakepop

Thanksgiving was lovely and I love all the smells of different food wafting through the house but I am one of the people. The Christmas people. By the time Thanksgiving rolls around I am almost dying of impatience to decorate the house. No matter how much I want to I just can't skip Thanksgiving and decorate before we sit down and eat our Thanksgiving meal. That being said, when I started making cake pops this weekend it was for a very special friend who happens to be my EMT Partner. He received a big promotion and today is his last day as my partner. The plan was to make secret ninja cake pops because he is a secret ninja taking over the world...but what happened was...Christmas music and the Macy's Thanksgiving Day parade. I made one ninja cake pop and some how the entire batch turned into Christmas cake pops. I saw one little girl walking in the parade with a red Berra and I was lost in Christmas. So my partner got a cake pop gift of Christmas with one secret ninja!

Step 1: Bake your cakes (use your good ole box variety or your grandma's passed down generation recipe)
Step 2: After cake cools crumble that baby up and mix in your frosting (I used cream cheese frosting   
            because I made a red velvet cake)
Step 3: Form your cake balls with a small ice cream scoop or your hands and let chill at least 10 minutes in
            freezer. I also dip my Lolly-pop sticks in melted chocolate and stick them in the cake balls before
            I chill them so they are sturdier to dip. If you are new to cake popping and need more detailed
            instructions go to: Bakerella she the Queen and Master of all things cake pops and her
            tutorials are awesome.
Step 4: Dip those cake pops in the candy melt or chocolate of your choice and decorate like your Van
            Gogh looking up at a Starry Night.

You need your edible disco dust. Christmas was made to sparkle.
If it is a stocking/ornament/light and it doesn't sparkle you better
keep it cause this girl wants glitter in her Christmas.

Now Cupcakes...I am working on my royal icing work but we aren't
there yet so I got these cuties a my local cake decorating store
and they are too cute for Christmas words!


Little Red Berra Cake Pop
Find your theme and inspiration. Mine
was a little girls red Berra in a Christmas Parade.


 Christmas Explosion Cake Pop
I like to take the first two or three
cake pops and test out all my decorations to see what
I am going to like best. Don't be shy...let your inner Pollock run free.


Pollock Cake Pop
Christmas Party Cake Pops
   
The Christmas Party Cake Pops ready for the Paparazzi.


Sweet Candy Cake Pops

Sweet Candy Snow Storm Cake Pops


The Snowpack Cake Pops


The Snowpack Frosty Cake Pop

Blizzard Cake Pop


Lonely Blizzard Cake Pop

Pure Christmas Cake Pop


Pure Christmas Wonderland Cake Pop


The Christmas Cake Pops

Christmas Light Cake Pop


Christmas Tree Cake Pop

Santa at the North Pole Cake Pop

Merry Christmas to all


This is what I am talking about! Let it sparkle and snow! Really
I hate the snow and the cold which is why I live in Las Vegas
but I like the cuteness of it anyways...
 
 PS: I promised you a ninja...


Our Thanksgiving meal...plus the good stuff (all items with sugar)

So lets just dive right in to the good stuff first. Because I love desert most we are going to start this Thanksgiving meal off with yummiest!
I started with Cherry pie mini-hearts. Believe it or not
 I found this red heart pie cutout mold online at
Avon!! I have the most awesome Avon Representative Alicia Densel (who also happens
to be my boyfriend's big sissy and mother of two of the most adorable
little boys you have ever seen). Did you know Avon sold baking
goodies? I didn't until I found this and snatched it right up!

Step 1: cut out the heart shapes with the back of the heart pie mold
Step 2: lay one cutout inside the mold and fill with desired pie filling:
I choose cherry because I love cherry pie bunches.
Step 3: lay the second heart cutout on top of the pie filled one and close
the pie mold to crimp the sides and seal the pie.
Step 4: place all mini-pies on cookie sheet or glass baking tray and
                    cook following directions of pie filling you are using. I cooked
these at 375 deg F for 15 minutes and they came
out perfect.


Now for the hearty pie. Since it is just me, Jordan and Ryan this year for
Thanksgiving I decided five different kinds of pies would be to much. Being
from the South I have to have Pumpkin Pie and Sweet Potato Pie. I still though two
pies would be too much for just us three so I made one pie with both! This is
a Sweet Potato Pumpkin Pie and came out super yummy.
I will make a recipe card soon and post it for y'all with the ingredients I used.

Love/Hate:
So I have a totally love hate relationship with Turkey. I have dropped them, burnt them, undercooked them and every thing in between. It really is a dang picky bird. However though years of trial error I have finally beat this bird! I am going to share my hard learned tips in case you are currently in the Turkey War Trenches like I have been for a decade.


Hello my old foe! I whooped your butt this year!

Step1: After the bird is thawed I clean it and the let it sit on the counter
for an hour before I glaze it and stick it in the oven. While it is sitting there I
place a bag of ice on the breast of the turkey and let the legs come up
to room temp. This way when the turkey is cooking they cook at the same speed.
Step 2: Glaze Cupcakes. Got to have it. It will just be a dry ole bird without.
I melted a stick of butter, added 1/2 cup of brown sugar to the melted butter
and turkey rub spices. I then slathered the bird in the glaze, poured inside the bird, and
dumped the rest on top for good measure.
Step 3: Turkey bags. Use them. Two reasons: 1: they really do help the bird
keep the juices and flavor better. 2: If you drop the damn thing it has some kind
of protection so it is not a total loss.
Step 4: Bake it upside down. That way all the juices run to the breast and it
doesn't get so dried out. I know there is a lot of debate in the
cooking universe about this but it works for me so I am going to keep doing it.


Do have a Veggie hater in your life? Well stuffing is the perfect way
to trick them into eating some good food. Ryan is Irish and if it is not a
meat or potato he could really care less about it. So I try and sneak
veggies into every meal I can. The great thing about stuffing is the flavor of the herbs is
so strong it hides the veggies most excellently.
Step1: Melt the butter and herbs (what ever herbs tickle your fancy). I used sage, rosemary and some
other Italian seasons.
Step 2: Fry up some turkey bacon. You can use regular bacon
but any chance I get to sneak some turkey bacon past Ryan I take it. The bacon
won't be the star of the stuffing so it won't be as noticeable it is turkey.
Step 3: Add your veggie. I added spinach and green peas.
Step 4: Add the stuffing or bread mix of your choice and broth.
Step 5: Sprinkle on some cheese of you choice and bake that yummy in the oven
until nice and crispy on top.

If you are just starting your Christmas shopping and are looking for some cute baking/kitchen and other fabulous items go over Avon Awesome Alicia's store and grab up the goodies before they are gone.

Be safe shopping out there Cupcakes. It is a mad world full of mad shoppers :)


Bring on the pumpkin..pie pops that is.

I love pumpkin pie. I know everyone says that but it is my all time favorite. That is saying a lot because I really really love me some pie. Apple pie, sweet potato pie, cherry pie and pretty much every other pie ever made. If you pie it, I want to eat it. So that being said I love pumpkin the most. That is why when I saw pie pops on Bakerella's site I had to make some pumpkin pie pops. Now on Bakerella's site she uses cherry pie mix but you go right ahead and fit your own pie needs. My pie needs are pumpkin so that is what we are doing today. We are also going to be making Bakerella's pumpkin pie bites with our left overs.

First we need to make pumpkin pie mix. Now there is nothing wrong at all Ladies and Gents with buying an already thrown together pumpkin pie mix and skipping this first part. However as I mentioned before I love me some pumpkin pie and only homemade my way will do the trick.

We are going to need:
4 oz. cream cheese, room temperature (Bakerella's calls for 8 ounces but I use four to cut down on the fat
                                                             and it works just a great.)
1/2 cup sugar (I use brown sugar only when making pumpkin anything)
1 1/2 cup canned pumpkin
3 eggs (only two go in mix, one is for washing the pie crust with egg white)
1 teaspoon vanilla (If you love vanilla like me don't be afraid. Go ahead and add a dash more)
1 teaspoon pumpkin pie spice (Ok I use my own spice mix of cloves, honey and cinnamon but you do your pie however your Momma raised ya.)
Cookie cutter: heart shaped, round shaped, pumpkin shaped. What ever fits your moods Cupcakes.

Now if you have a mixer this will be even easier for you. I am not The Princess of anything (except
laundry. I totally rock out laundry) so I can't ever seem to justify spending a car payment on a mixer. :(

Get ready to get your beat on!


Place some parchment paper on the surface you are going to be working,
grab your pie mix, store bought pie crust (unless your Martha Stewart and then you are
awesome and should only ever eat your own homemade pie crust because
everything else would be lame)  some flour and lolly-pop sticks.

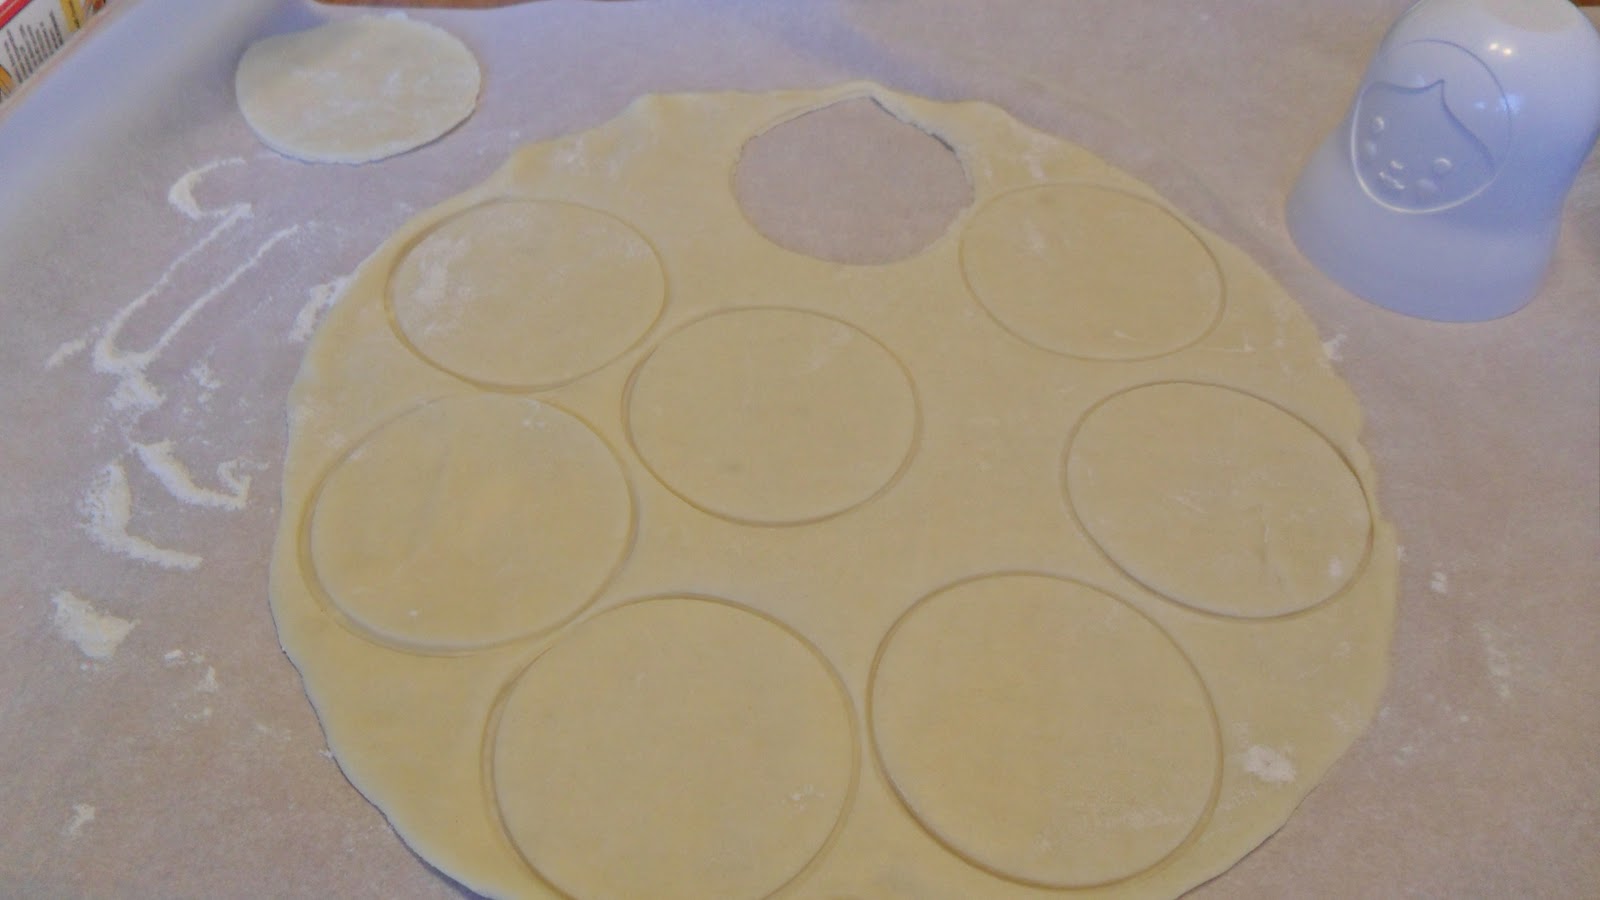
My little Matryoshka Measuring cups I got from
Bakeitpretty have a duel purpose today. They are going to be
my prefect size round cookie cutters to cut out the pie shells.


Just press down and twist with your cookie cutter until you have an equal amount
of circles. Remember you will need two circles for each pie pop. One for the back and one
for the front.

Once I have the circles I like to line them up factory style and place the lolly-pop
sticks in the bottoms circles. Just half way should be prefect.


Add the pie mix to the center of the pie circle with the lolly-pop stick already in it.
Then cover with a second circles and crimp the sides down with one of the extra
lolly-pop sticks or a fork so it is nice a sealed. Don't worry if a little leaks out. Just
run a lolly-pop stick along the edge and it will clean that right up.


My premade pie crust I bought came with two pie crust so after I finished the
pie pops I decided to make mini pies with the left over pumpkin filling and crust.
Same principle as the pie pop. Cut out the circles and then press one pie
circles down into a mini muffin pan. Fill in with extra pie mix.  


After I baked them at 375 degrees F for 12 minutes. They came out perfect.
Don't worry about them being a little bubbly when you take them out they will
deflate a little while cooling.

Now we have the pie pops and mini pies all baked and cooled we need to decorate Cupcakes!


I used a brown chocolate candy writer to decorate these. Bakerella
drew pumpkin face on her mini pumpkin pies and those were cute too but I
wanted something a little more traditional for this Thanksgiving and little less
cutie.


Do you have a coffee pot Cupcake? Well if you do then I am going to tell
you melting these will be super easy. Just fill the coffee pot with hot water (not boiling) from the tap.
Place the tube in the water until it is soft and chocolate melted. Then open it up and paint away!


Isn't pumpkin just the best invention ever.

Yummy.

I hope everyone has an amazing Thanksgiving filled with lots of love, family, kindness, thankfulness and some really good eatins! Take pictures of you Thanksgiving meals and share them with me at my Community: Mommy Baking love into it.. I would love to see them Cupcakes!

Hot Coco and Weekend Plans...

I thought this would be a great time to make hot chocolate and coffee cups since the weather is finally getting a little chilly in Las Vegas. If you have a chocolate pro this is super easy to do and if you don't it is still easy you just need a few more steps of melting the chocolate for a few minutes, stirring, melting some more and then dipping.

I went to the dollar store and purchased some plastic picnic cups on sale. I then dipped the edges of the cup in peanut butter chocolate that had been laced with a little drop of mint. After you have a good coating on the edges keep the cup upside down on parchment paper so the chocolate can harden. Then drizzle the inside with chocolate peanut butter to really flavor the hot chocolate. I had some green bows stored from cake pops I made and had too much candy melt left over. Just grab a chocolate mold and use your excess chocolate every time to you make cake pops. This comes in handy when you are baking cupcakes, cakes, cookies or even other cake pops. You already have a mini chocolate decoration kit ready from all the extra candy melt.


I also dipped plastic stirring spoons in the chocolate and then
covered them with marshmallows ready for stirring the hot chocolate
and adding the marshmallows all at the same time.


These are extra chocolate buttons I had left over
after making the working woman cake pops.
Now...What are you big plans for this weekend? I am super lucky and received a package in the mail today from Bake It Pretty. It had tons of wonderful cupcake making supplies my awesome boyfriend Ryan ordered for me. If you haven't taken a peak at their super cute items I suggest it highly! I love all their throw back cupcake liners and supplies. So I am starting to think it will be a cupcake theme weekend my Cupcakes !
Cupcake kit. Comes with tons of cute cupcake liners, sprinkles and cupcake toppers
for all occasions.

Look at the cute pink suite case package it comes in
Cupcakes! Does it get any cuter?


I just love leopard print anything...

OK so this is the awesome. A portable cupcake lunch box with
multiple levels. It has a storage place for the spoon and fork (included)
a place for the cupcakes, and a bottom storage for napkins. Brilliant!

Now these were the prize of the order. These awesome little Russian dolls
are really measuring cups! They will look super cute in my kitchen and
help me with baking. I love them!